
Jekyll on App Engine with CI/CD
Jekyll sites can be configured to run on Google App Engine and be built automatically using Google Cloud Build. Since Jekyll sites are entirely static files we can host these sites very cheaply, if not for free, using App Engine. The only time an instance is spawned is to serve fancy custom 404 pages.
Create a new Jekyll site
Initialize the site
Assuming you have followed the instructions on Jekyll’s website and have a functional installation, we’ll want to start by creating a new Jekyll site
jekyll new mysitename
Running bundle install in mysitename...
New jekyll site installed in mysitename.
Create a Git repository
We’ll need the site to be a git repository so we can push to GCP in order to kick off our CI/CD automation. I’ll assume from here on out that you have installed Git and are already familiar with its basic usage.
cd mysitename/
git init
Initialized empty Git repository in mysitename/.git/
Adjust the _config.yml to suit your needs by updating the site name, URL, and any other options. Once you’re satisfied let’s do a git commit. This will give us a nice snapshot to revert to before messing with anything complicated like themes or plugins.
git commit -m "Initial jekyll setup"
[master (root-commit) f6b9286] Basic setup
 7 files changed, 215 insertions(+)
 create mode 100644 .gitignore
 create mode 100644 404.html
 create mode 100644 Gemfile
 create mode 100644 Gemfile.lock
 create mode 100644 _config.yml
 create mode 100644 about.markdown
 create mode 100644 index.markdown
Done
Optional: Test the site
We can confirm our Jekyll site is properly set up by serving it locally. This can be useful if you’d like to test how something looks before committing it, but from this point forward we won’t actually need to have Ruby or Jekyll available to publish and make updates do the site. Everything from this point forward will be handled by Cloud Build on GCP.
jekyll serve
Configuration file: mysitename/_config.yml
            Source: mysitename
       Destination: mysitename/_site
 Incremental build: disabled. Enable with --incremental
      Generating...
       Jekyll Feed: Generating feed for posts
                    done in 0.328 seconds.
 Auto-regeneration: enabled for 'mysitename'
    Server address: http://127.0.0.1:4000/
  Server running... press ctrl-c to stop.
Set up Google Cloud Platform
Create the GCP project
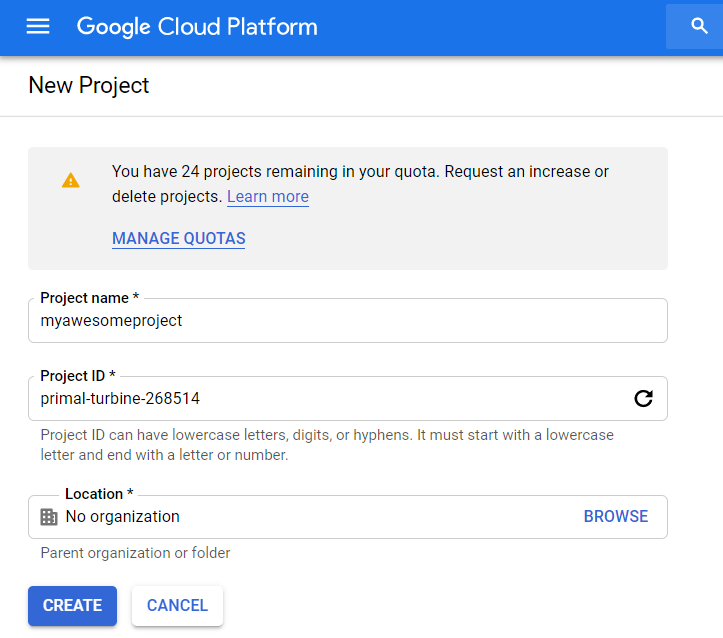 The first thing we need to do on GCP is to create a new project to house our site. I’ll assume you’ve already gone through the process of setting up a Google account and enabling access to Google Cloud Platform. I prefer to set up one GCP project for each site I’m hosting, and this actually becomes almost mandatory when using App Engine. Each project can only host a singular App Engine application. You can use multiple “services” in App Engine to host subdomains, but all App Engine services in the project share the same custom domain.
Set up App Engine
We’ll also need to create an App Engine app for us to deploy the site to. You’ll be asked to select a region and a language/environment. It really doesn’t matter which option you choose for the language since the app.yaml we define later will do this for us.
Next we’ll need to enable the App Engine Admin API so that Cloud Deploy can use it to publish new versions of our site as they are pushed via Git. Cloud Deploy will use its own service account to publish the app via this API, but it has to be enabled manually first.
Set up Cloud Source Repositories
 In this example we’re going to be using Google’s “Cloud Source Repositories” to host the Git repo that contains our site. Cloud Deploy does also support watching third party repositories like GitHub, but Cloud Source Repositories are free on GCP for a single user using 5 projects or less. Create a new repository attached to the project we just created. I usually just name the repository the same as the project name, but you may give it any name.
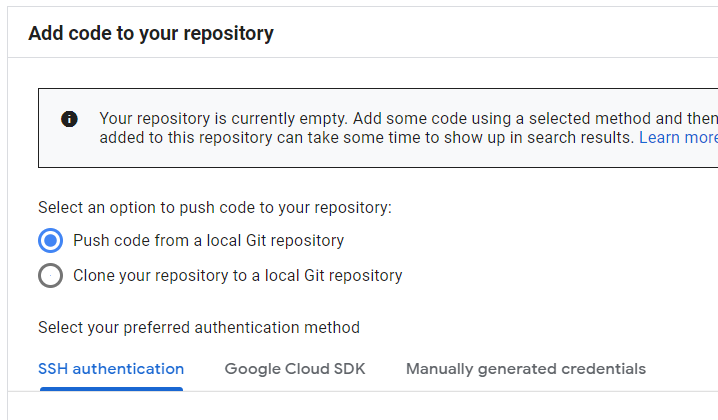
Once the repository is created the GUI will give us a few options for populating it. Since we already have a local repository, we’ll want to choose “Push code from a local Git repository”. If you haven’t done so already you should register your SSH key in GCP so you can access Cloud Source Repositories over SSH. You can also use the Google Cloud SDK or manual credentials for authentication, but most people are probably already used to using SSH keys for Git.
Go back to your local Jekyll site repository and run the commands provided by Google
git remote add google ssh://[email protected]@source.developers.google.com:2022/p/primal-turbine-268514/r/myawesomeproject
git push --all google
Enumerating objects: 9, done.
Counting objects: 100% (9/9), done.
Delta compression using up to 4 threads
Compressing objects: 100% (8/8), done.
Writing objects: 100% (9/9), 3.60 KiB | 3.60 MiB/s, done.
Total 9 (delta 0), reused 0 (delta 0)
To ssh://[email protected]:2022/p/primal-turbine-268514/r/myawesomeproject
 * [new branch]      master -> master
Set up Cloud Build
Now that we have our repository and an empty App Engine setup, we can enable Cloud Build to automatically deploy our Jekyll site. Before we do anything you’ll have to enable the Cloud Build API so that we can add triggers.
Next, create a new Cloud Build trigger to watch the repository that we just created. You can set most of these values to whatever you would like. I set my trigger type to “Branch” and matched on the regular expression ^master$ to only run a deploy when I push commits to the master branch. You could also use tags to control when deploys happen. The only real requirement here is to choose Cloud Build configuration file for your build configuration. Leave the default as “cloudbuild.yaml”.
The final step is to go to the Cloud Build settings page and make sure the “App Engine Admin” role is enabled for our Cloud Build service account. It will need these permissions to deploy the app on App Engine. At this point we’re ready to push code and have it automatically deployed to App Engine.
Set up Jekyll for automatic build/deploy
We’ll be adding two files to our Jekyll repository to enable automatic builds and deployment to App Engine. The first is an “app.yaml” manifest that instructs App Engine on how to handle request to the site. The second is a “cloudbuild.yaml” that instructs Cloud Build on how to spin up a Jekyll container to build the static files for the site.
Add the app.yaml
The app.yaml file gets pretty complicated because we’re trying to offload as many requests as possible to the static file handlers. We need to account for as many types of requests as possible and make sure they are routed to the correct files. Ideally the only types of requests that actually fire up an instance are 404s. In this case we need the actual Jekyll app to respond because we can’t return a friendly 404 page and also set the response code to 404 using the static handlers.
We use a couple different flags on the Jekyll serve command to avoid some issues:
- -P $PORT
App Engine requires that we run on a particular port provided at runtime - –safe
Running in safe mode avoids writing to the file system, which would fail in an App Engine instance - –skip-initial-build
Cloud Build is handling the build process for us, and it would fail anyway with a read-only file system - –no-watch
There is no point in watching for changes since we’re running in an App Engine instance - –trace
Provide useful log messages in the event we crash
I set my app to basic scaling using the smallest instance class with a 1 minute timeout. The instance is really only ever going to have to handle 404s so there is no reason to change this unless you want your 404 pages to respond faster. In my testing they usually took about 2-4 seconds to respond if there was no running instance. One minute is the minimum amount of time billed for an App Engine instance, so we timeout the instance after that point.
Depending on your use-case it might be better to use automatic scaling instead of basic scaling. If you suspect that your app will receive a lot of traffic and you are below the free tier limits, automatic scaling will be less expensive. App Engine allows 28 instance-hours of automatic scaling instances but only 8 instance-hours of basic scaling instances under free tier.
All of the handlers except for the first and last ones basically try to translate a friendly URL into a real file path. “/blog” tries to find “/blog.html” or “/blog/index.html” before sending the request to “script: auto” and spinning up an instance. “require_matching_file: true” is the special sauce that allows this sort of functionality.
runtime: ruby25
entrypoint: bundle exec jekyll serve -P $PORT --safe --skip-initial-build --no-watch --trace
instance_class: B1
basic_scaling:
  max_instances: 1
  idle_timeout: 1m
handlers:
# Real file names
- url: /(.+)
  static_files: _site/\1
  upload: _site/.*
  require_matching_file: true
  secure: always
  redirect_http_response_code: 301
# Directory indexes
- url: (/.+)?/
  static_files: _site\1/index.html
  upload: _site/.*
  require_matching_file: true
  secure: always
  redirect_http_response_code: 301
# Directories as files
- url: /(.+)/
  static_files: _site/\1.html
  upload: _site/.*
  require_matching_file: true
  secure: always
  redirect_http_response_code: 301
# Friendly extensionless file URLs
- url: /(.+)
  static_files: _site/\1.html
  upload: _site/.*
  require_matching_file: true
  secure: always
  redirect_http_response_code: 301
# Friendly extensionless directory URLs
- url: /(.+)
  static_files: _site/\1/index.html
  upload: _site/.*
  require_matching_file: true
  secure: always
  redirect_http_response_code: 301
# Catch-all
- url: .*
  script: auto
  secure: always
  redirect_http_response_code: 301
Add the cloudbuild.yaml
The cloudbuild.yaml provides the steps to build and deploy the Jekyll site.
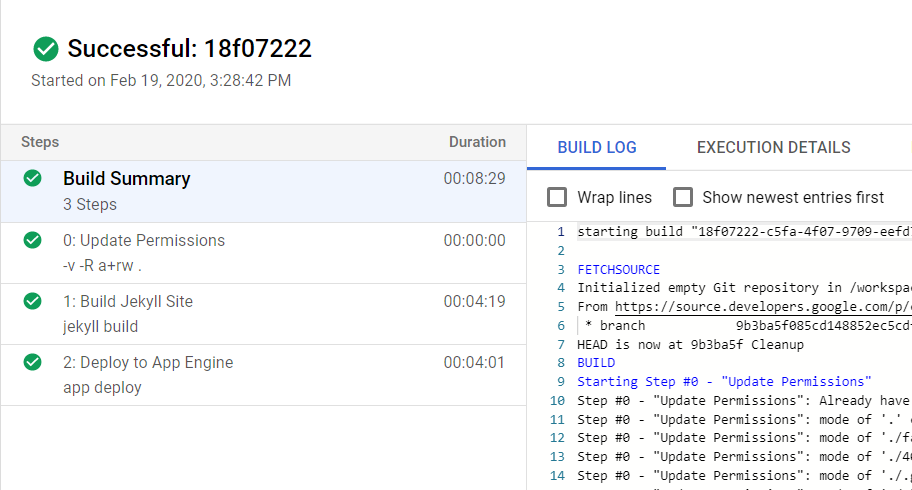
The first step runs chmod to add read/write permissions for all users in the build workspace. The Jekyll container runs as a non-root user by default and the lack of permissions will cause build errors. Almost any container could be used for this purpose so I used the built-in cloud-builders git container.
The second step uses a Jekyll container to run “jekyll build” on the workspace which will populate our _site directory with the static files that App Engine will serve. Assuming there are no issues with your Jekyll configuration we should get a successful build and be ready to publish.
The third and final step is to actually deploy the app to App Engine. We use the built-in cloud-builders gcloud container and run “app deploy” on the workspace directory. This step will also cause App Engine to build a container image for our App Engine instances to use when they are invoked. This usually took around 10 minutes in my testing.
steps:
  - id: Update Permissions
    name: "gcr.io/cloud-builders/git"
    entrypoint: "chmod"
    args: ["-v","-R", "a+rw","."]
  - id: Build Jekyll Site
    name: 'jekyll/jekyll'
    args: ['jekyll','build']
  - id: Deploy to App Engine
    name: "gcr.io/cloud-builders/gcloud"
    args: ["app", "deploy"]
timeout: "15m"
Publish the site
We’re now ready to publish our site for the first time. Add the two yaml files we created, commit them, and then push to Cloud Source Repositories.
git add app.yaml
git add cloudbuild.yaml
git commit -m "Add deployment configuration"
git push --set-upstream google master
[master 6f2d752] Add deployment configuration
 2 files changed, 32 insertions(+)
 create mode 100644 app.yaml
 create mode 100644 cloudbuild.yaml
Done
Enumerating objects: 5, done.
Counting objects: 100% (5/5), done.
Delta compression using up to 4 threads
Compressing objects: 100% (4/4), done.
Writing objects: 100% (4/4), 1.05 KiB | 1.05 MiB/s, done.
Total 4 (delta 1), reused 0 (delta 0)
remote: Resolving deltas: 100% (1/1)
To ssh://[email protected]:2022/p/primal-turbine-268514/r/myawesomeproject
   f6b9286..6f2d752  master -> master
Branch 'master' set up to track remote branch 'master' from 'google'.
 Assuming everything is working as intended, we can head over to the Cloud Build build history and see our new build running. you’ll also see a second build spawn for the App Engine container image. Once the Cloud Build process is complete our app should appear in App Engine. This can sometimes take a few minutes. Eventually you should be able to visit your App Engine URL (project-id.appspot.com) and see your site.
At this point you have a fully functional site. You’ll probably want to add a custom domain instead of using the default appspot.com domain.
Future thoughts
Cloud Build creates a container image every time the app is deployed. We’d need to add another task to clean these up so we don’t incur unnecessary costs.
App Engine leaves a lot of old versions around when you deploy. We should probably also clean up old ones as part of our build process.
If you don’t care about friendly 404 pages and want to completely prevent App Engine from ever spawning an instance and incuring costs, you can replace the “Catch-all” handler with the handler below. I suspect that Google might at some point crack down on App Engine apps that never spawn an instance, but it doesn’t appear they have done so yet.
# Return 404
- url: /.*
  static_files: fakepath
  upload: _site/.*
  require_matching_file: false
  secure: always
  redirect_http_response_code: 301